Craftsman Lawn Tractor Belt Diagram: Your DIY Guide to a Perfectly Cut Lawn
Is your Craftsman lawn tractor refusing to cut grass? A worn-out drive belt is a common culprit, but fixing it is often easier than you think! This guide uses your Craftsman lawn tractor belt diagram to show you how to replace your V-belt, step-by-step. Even if you're a complete beginner, you can do this. For a visual aid, check out this helpful Craftsman belt diagram.
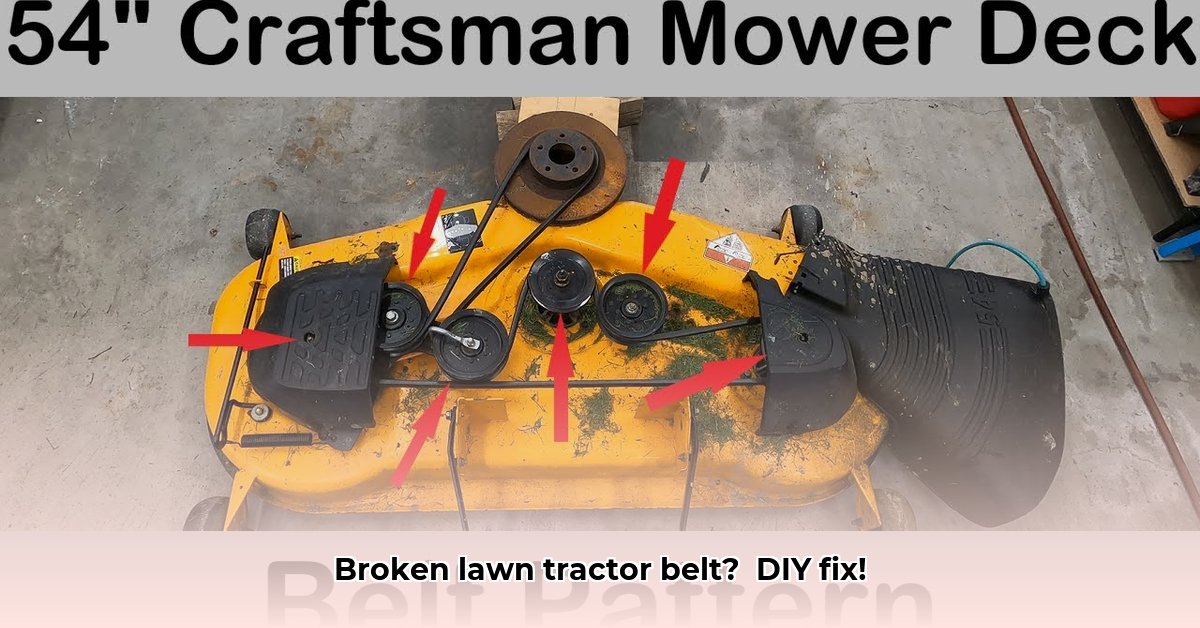
Understanding Your Craftsman Lawn Tractor Belt Diagram
Before you start, familiarize yourself with your mower's belt diagram (found in your owner's manual). This diagram is your roadmap, showing the belt's path around the pulleys. Studying it beforehand is crucial for a smooth repair—think of it as the instruction manual for your mower's belt system.
Essential Tools: Keep it Simple
You won't need a massive tool kit. Gather these essentials: a socket wrench set (check your manual for the correct sizes), possibly a screwdriver or two, and a new replacement belt (ensure it's the correct one for your model). Having everything ready simplifies the process.
Step-by-Step Belt Replacement: A Detailed Guide
These steps provide a general overview. Your specific Craftsman model might have slight variations, so always consult your owner's manual and belt diagram.
Safety First: Always disconnect the spark plug wire before starting any work. This prevents accidental starting and injury.
Locate the Belt: Remove any necessary panels or covers to access the belt. Your belt diagram will pinpoint its location. Access varies by model.
Loosen the Tension: Most Craftsman mowers have a tensioning mechanism (spring, lever, etc.) that allows you to loosen the belt before removal. Your diagram will show you where it is.
Remove the Old Belt: Carefully guide the old belt off the pulleys. Pay close attention to its routing—this is vital for reinstalling the new one. Your diagram is key here!
Install the New Belt: Carefully place the new belt onto the pulleys, precisely following the path illustrated in your diagram. It should fit snugly.
Set Proper Tension: Use the tensioning mechanism to tighten the new belt, following your owner's manual's instructions. It should be taut but not overly tight; incorrect tension leads to premature wear or slippage.
Reassembly and Test: Reinstall any removed panels or covers. Reattach the spark plug. Start your mower; ensure the blades spin correctly and the belt doesn't slip.
Troubleshooting Common Belt Issues
Even with careful replacement, minor issues can arise.
Belt Slipping: If the belt slips after reinstallation, check the tension. Adjust it if it's too loose.
Belt Breaking Quickly: A quickly breaking belt might signal improper tension or a pulley problem. Inspect the pulleys for damage or misalignment.
Missing Diagram?: Contact Craftsman customer support or check their website for downloadable manuals.
When Professional Help is Needed
If you're uncomfortable working on your mower or encounter unforeseen problems, don't hesitate to call a professional. Safety is paramount, and a qualified mechanic can handle any situation that feels overwhelming.
Preventative Maintenance: Proactive Care
Regularly checking your belt for wear and tear prevents costly repairs later. A few minutes of inspection can significantly extend your mower's lifespan.
How to Adjust Belt Tension on Craftsman Riding Mower
Is it Really the Belt? Diagnosing the Problem
Before adjusting belt tension, determine the actual problem. A whining noise with non-spinning blades often indicates a slipping belt. However, is it loose or worn?
First, inspect the belt for cracks, fraying, or damage. A severely damaged belt needs replacement; tightening won't fix it. Next, check the belt's route—is it properly seated on all pulleys? Finally, examine the spring mechanism maintaining the belt tension (spring-loaded tensioner, etc.). A weak spring results in insufficient tension and slippage.
Adjusting Belt Tension (If Necessary)
If the belt shows minor wear and the spring is strong, you might be able to adjust the tension. This process varies by model; consult your owner's manual. Generally, it involves locating the tensioner assembly, loosening bolts (or adjusting a lever/cable, as shown in your manual), and carefully adjusting the tension until it's firm but not overly tight. You should be able to deflect the belt slightly with your thumb but it shouldn't sag.
When Belt Replacement is Necessary
If you can't adjust the tension adequately or the belt is too worn, replacement is crucial. Follow your owner's manual's instructions, ensuring you use the correct replacement belt.
Safety First: Always Prioritize Safety
Before any repairs, disconnect the spark plug wire to prevent accidental starting. Wear safety glasses. If unsure about any step, consult a professional.